 Colouring Nest
Twelve-Point Star Paper Snowflake Template
- Ages 5+
- Easy
- 3 pages
- Template
- PDF: Letter & A4

Tip: print at 100% (actual size) on plain printer paper. Thin paper folds and cuts most easily, because every cut goes through 12 layers.
Up nextFern Paper Snowflake Template →Advertisement
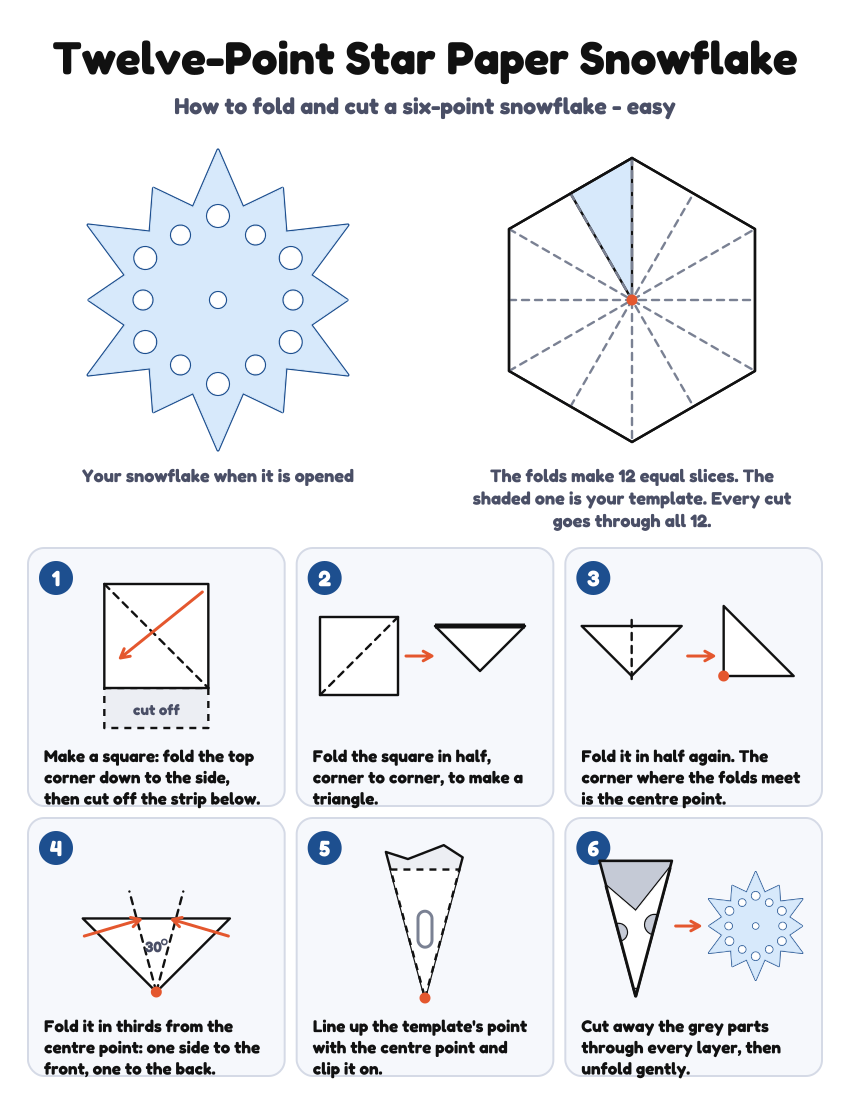
A easy six-point paper snowflake: twelve points, six long and six short. The PDF has three pages: how to fold a square into a 12-layer wedge, the cutting template in two sizes (10 cm long for a 21 cm square, 7 cm for 15 cm origami paper), and a picture of the opened snowflake, drawn from the template itself so you can see what you are aiming for. A good first snowflake: big, simple shapes that children from about five can cut with help.
What is in the PDF
- Page 1: how to fold. Six steps from a sheet of paper to a 12-layer wedge, with a fold diagram.
- Page 2: the cutting template in two sizes. Cut away the grey parts and keep the white ones.
- Page 3: the opened twelve-point star snowflake, drawn by mirroring the template at every fold, so it shows exactly what your cuts make.
Template sizes
Print at 100% (actual size). Choose the A4 PDF in the UK, Australia and New Zealand, and the Letter PDF in the US and Canada.
| Template | Paper square | Length on A4 | Length on US Letter |
|---|---|---|---|
| Large | 21 cm or 8½ in (the width of the sheet) | 10 cm | 3¾ in (9.6 cm) |
| Small | 15 cm or 6 in origami paper | 7 cm | 2½ in (6.7 cm) |
How to make the twelve-point star snowflake
- Make a square. Fold the top corner of a sheet of A4 or Letter paper down to the opposite side, so the top edge lies along the side, and cut off the strip below. Unfold: you have a square. Origami paper is square already.
- Fold it into a triangle. Fold the square in half from corner to corner.
- Fold it in half again. Fold the triangle in half to make a smaller triangle. The corner where the folds meet is the centre point of your snowflake.
- Fold it in thirds. Hold the centre point at the bottom and fold one side over by a third, then fold the other side behind it, so the edges line up and you have a narrow point (30 degrees). Lay it on the template to check the angle.
- Clip on the template. Cut out the template, lay it on the folded paper with the red dot on the centre point and both long sides on the folds, and hold it with a paper clip. Cut off any paper that sticks out past the top.
- Cut and unfold. Cut away every grey part through all the layers. Shapes drawn on a fold are halves: start cutting at the fold. Open the paper slowly and press it flat under a book.
More easy snowflakes: Classic Star · Heart · Flower · Diamond · All paper snowflake templates · Every design in one PDF · Snowflake colouring pages
Advertisement
More printable templates


For parents & teachers: Christmas Mandala Pack, a printable pack from our shop.
Seasonal: Winter Coloring Pages
Collections: Snowflake Coloring Pages
You might also like


Printing tips
- Print at 100% (actual size) so the shapes match the sizes listed.
- Thin card (160–200 gsm) makes sturdy stencils and decorations.
- Fold the paper and cut two layers at once for matching pairs.
- Paper snowflakes are the exception: use thin printer or origami paper, because every cut goes through 12 layers.
Advertisement